Thursday 21 October 2010
Accessing Journals from off-site
It is possible to access journals and articles by setting up off-site proxies in Safari. I use them when I need to download articles on my laptop at home. This procedure works well. The instructions for Snow Leopard link to another webpage (Berkeley): just follow the instructions, and don't forget to enter Bristol's URL, as opposed to Berkeley's one.
Friday 20 August 2010
LDAP configuration for University of Bristol (Mac desktops and Laptops, iPhone, iPod touch)
This is how to set up the LDAP server on Apple Mail on your mac desktop or laptop (tested on OS 10.6.4), specifically for the University of Bristol.
Follow these steps:
1) Open "Mail" and go to "Preferences"
2) Select "Composing" and click on "Configure LDAP"
3) Click on "+" and fill as follow:
Name: Public Directory
Server: ldap-srv.bris.ac.uk
Port: 636 with SSL
Search Base: cn=users,dc=bris,dc=ac,dc=uk
Scope: Subtree
Authentication: Simple
User name: uid=YUOR_UNIVERSITY_ID,cn=Users,dc=bris,dc=ac,dc=uk
Password: YUOR_UNIVERSITY_PASSWORD
This should also add a new account to "Address Book". If it doesn't, add it manually using the same settings.
On the iPhone or iPod Touch (tested on iOS 4.2) the procedure is slightly different:
On your device, go to: Settings> Mail, Contacts, Calendars> Add Account...> Other> Add LDAP Account>
Server: ldap-srv.bris.ac.uk
User name: uid=YUOR_UNIVERSITY_ID,cn=Users,dc=bris,dc=ac,dc=uk
Password: YUOR_UNIVERSITY_PASSWORD
Description: Public Directory
use SSL: off
then on Search Setting go to: Add Search Setting..
Base: cn=users,dc=bris,dc=ac,dc=uk
Description UoB LDAP
Scope: Subtree
you can cancel the default search base
Enjoy!
Three-column version of Apple's Mail app

If you have always wondered how to create a three column view in apple mail (of vertical layout), in order to take full advance of widescreen displays then download and install letterbox-widescreen from this link http://harnly.net/downloads/MailWidescreen.html.
Easy as it sounds!
Enjoy
Monday 24 May 2010
PATRAN 2010 on Parallels
For those of you (like ourselves) that always wonder what runs and what does not run on Parallels (or any virtual machine for that matter) we have some exciting news. We have been able to run Patran 2010 and Patran 2010 for MD Nastran on our MacBook Pro's using Parallels 5. We have XP SP3 installed on Parallels. MD Nastran R3 also runs and you should believe me as I for that matter will not go into details over that.
Although fairly straight forward to get to work we did run into a very simple problem of which I will elaborate on the fix shortly. The other members of this blog might be so inclined to explain in a more technical manner why the fix, but I do not intend to as I have no idea and I just know it works now!
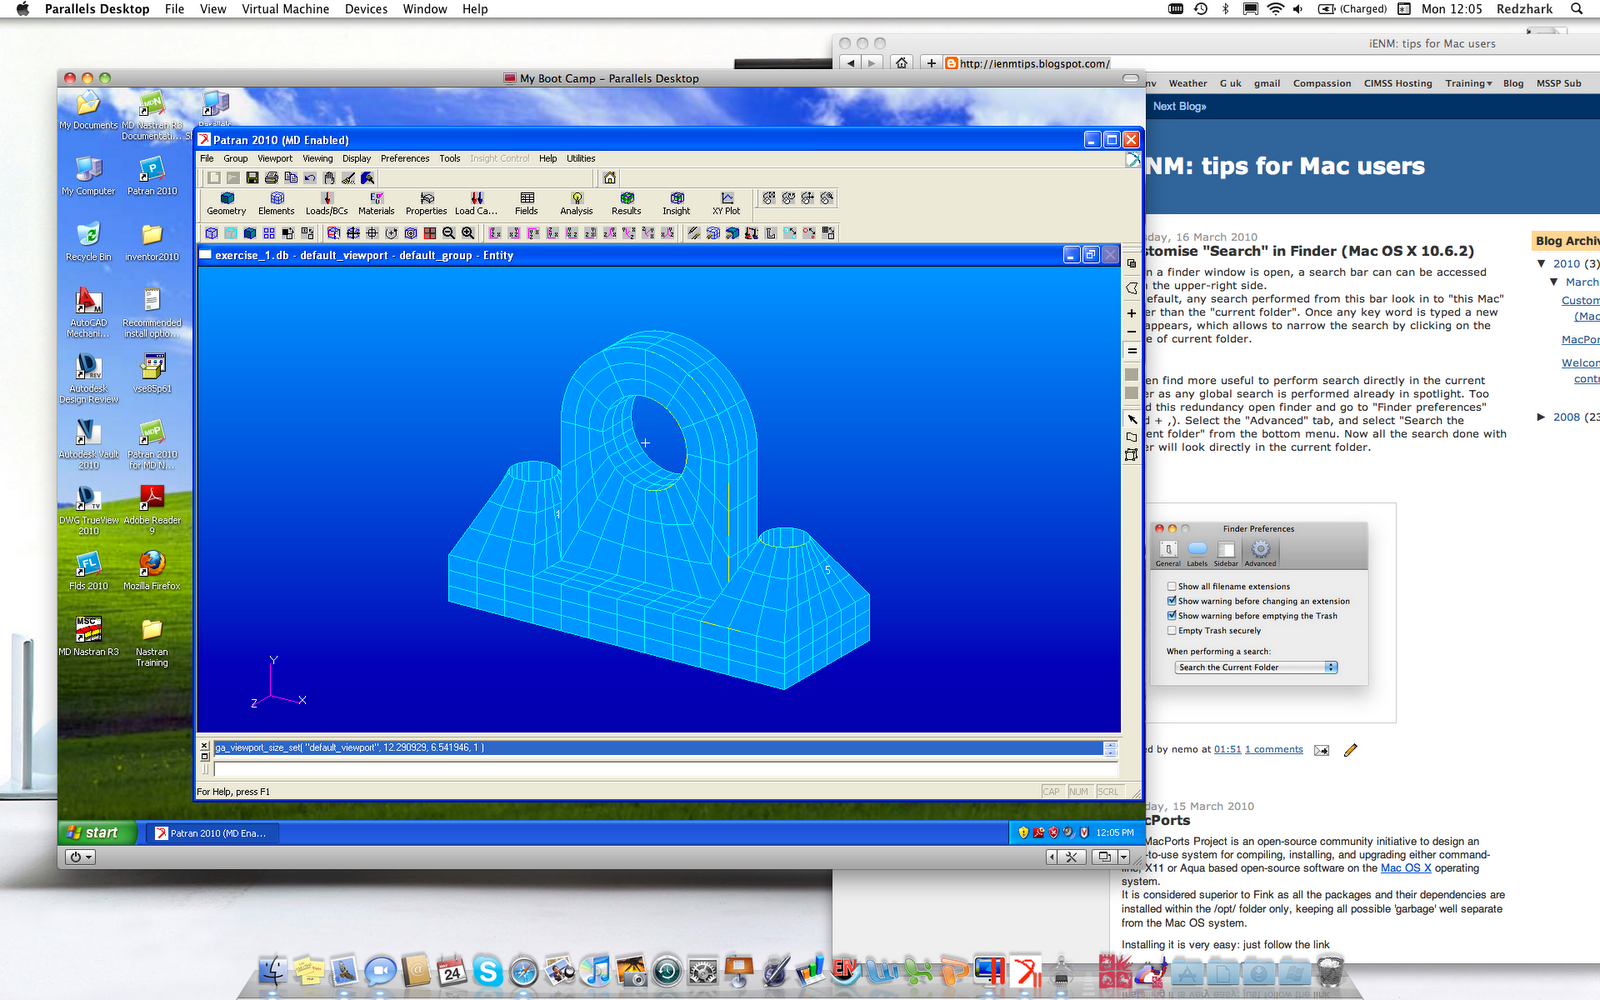
First of all for those who want to see here is a screen shot of Patran 2010 MD running on my computer. (My computer is a MacBook Pro 3.06 Ghz Intel Core 2 Duo with 4GB Ram ).

We have not yet tested the limits of performance as compared to running it natively on the bootcamp partition. As we become more familiar with its performance we might be inclined to post updates.
Glitch: One of the problems we had was that when you launched Patran in Parallels 5 it would load to the main window and when you started a new file or open an existing file it would crash with no warnings. We suspected a memory problem. After talking with MSC Nastran and Parallels we came to two different ways of fixing this.
Approach 1:
On your Windows (in our case Windows XP) side go to Display properties/ Advance/ Troubleshoot and adjust the Hardware Acceleration bar to about half way. See picture below.
 Then Apply the changes and Load Patran. After Patran has loaded I recommend coming back and changing the Hardware Acceleration back to Full. Why? Well because it works fine once it has launched and the mouse will seamlessly move form your Parallels to your Mac. If not your mouse will get stuck inside XP and you will have to Expose every time you need to move your mouse to the Mac side. So, without a doubt this will fix your problem but it is a little tedious to deal with every time you launch Patran. That is why we have Approach 2.
Approach 2:
This requires changing the setting on the Virtual Machine. In this case open Paralles without launching Windows. In Parallels Go to: Virtual Machine / Configure/ Hardware Tab/ Video. Here you want to disable the 3D Acceleration. This should be enough to let you launch Patran. We have tried it with 256 MB and it worked so there should not be a need to reduce it, but if it does not work feel free to play with this starting maybe at 64MB and moving your way up.

 Hope this helps someone.
Although fairly straight forward to get to work we did run into a very simple problem of which I will elaborate on the fix shortly. The other members of this blog might be so inclined to explain in a more technical manner why the fix, but I do not intend to as I have no idea and I just know it works now!
First of all for those who want to see here is a screen shot of Patran 2010 MD running on my computer. (My computer is a MacBook Pro 3.06 Ghz Intel Core 2 Duo with 4GB Ram ).
Glitch: One of the problems we had was that when you launched Patran in Parallels 5 it would load to the main window and when you started a new file or open an existing file it would crash with no warnings. We suspected a memory problem. After talking with MSC Nastran and Parallels we came to two different ways of fixing this.
Approach 1:
On your Windows (in our case Windows XP) side go to Display properties/ Advance/ Troubleshoot and adjust the Hardware Acceleration bar to about half way. See picture below.

Approach 2:
This requires changing the setting on the Virtual Machine. In this case open Paralles without launching Windows. In Parallels Go to: Virtual Machine / Configure/ Hardware Tab/ Video. Here you want to disable the 3D Acceleration. This should be enough to let you launch Patran. We have tried it with 256 MB and it worked so there should not be a need to reduce it, but if it does not work feel free to play with this starting maybe at 64MB and moving your way up.


Tuesday 16 March 2010
Customise "Search" in Finder (Mac OS X 10.6.2)
When a finder window is open, a search bar can can be accessed from the upper-right side.
By default, any search performed from this bar look in to "this Mac" rather than the "current folder". Once any key word is typed a new bar appears, which allows to narrow the search by clicking on the name of current folder.
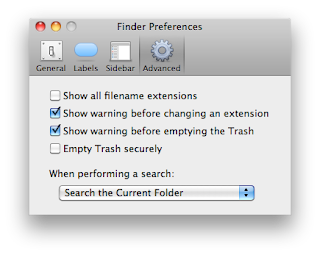
I often find more useful to perform search directly in the current folder as any global search is performed already in spotlight. Too avoid this redundancy open finder and go to "Finder preferences" (cmd + ,). Select the "Advanced" tab, and select "Search the Current folder" from the bottom menu. Now all the search done with finder will look directly in the current folder.
Monday 15 March 2010
MacPorts
The MacPorts Project is an open-source community initiative to design an easy-to-use system for compiling, installing, and upgrading either command-line, X11 or Aqua based open-source software on the Mac OS X operating system.
It is considered superior to Fink as all the packages and their dependencies are installed within the /opt/ folder only, keeping all possible 'garbage' well separate from the Mac OS system.
Installing it is very easy: just follow the link
http://www.macports.org/install.php
and instruction and you will be up and running in few minutes.
Also the documentation is very comprehensive
http://guide.macports.org/
Selfupdate
Once installed type on the Terminal
'sudo port selfupdate'
in oder to sync the local ports tree with the global MacPorts ports repository so you will have the latest port versions.
Install Port
In order to install a port (e. g. ImageMagick) type
'sudo port install ImageMagick'
MacPort will automatically find and install all the depend package.
Dependencies
In order to see of all the possible dependencies of a given package, type
'port deps ImageMagick'
Wednesday 10 March 2010
Welcome to our new contributors
Just to introduce you to Alberto, Nima and Pablo, who are new contributors and administrators of this weblog. A very warm welcome. I hope you will manage to keep this blog alive.
Friday 7 March 2008
Gnuplot
Gnuplot is a very popular plotting utility. In order to have full support under Mac OSX, I encourage you to compile it from source. The thing is a bit tricky, as Leopard do not include a decent GNU readline for history support. I will report on how to configure Gnuplot to have the aquaterm, X11, png, jpeg, pdf terminals available, and to have GNU readline support (you need it to have tab completion and history facilities).
- Install Aquaterm (a few mouse clicks)
- From fink install the packages pdflib and gd2. This is done from a terminal with the commands fink install pdflib and fink install gd2. These packages contain png, jpeg and pdf libraries.
- Install GNU readline. Some people adviced to delete Leopard's default readline and to substitute with GNU readline. I have rather installed GNU readline in /usr/local and instructed Gnuplot to link against it. Download readline from here and unpack it somewhere: before running configure, make and make install, you will have to patch one of the configure scripts. In the gnuplot folder search for the file support/shobj-conf and patch it following this. Patching is not hard, you can open support/shobj-conf and see that it looks similar to the patch file. Do you see those lines in the patch file that begin by "+" and "-"? Lines with "-" represent lines already existing in support/shobj-conf: you are going to go in support/shobj-conf and replace them with the corresponding "+" lines of the patch. Alternatively, you can use the unix patch command. At this point you can run configure, make and make install. Default installation is in /usr/local/lib.
- Download Gnuplot source code and unpack it somewhere. In the Gnuplot directory run configure with ./configure CC=/usr/bin/gcc CFLAGS=-O3 CXX=/usr/bin/g++ --with-readline=/usr/local/lib LDFLAGS=-L/usr/local/lib CPPFLAGS=-I/usr/local/incl. The compilers flag are to make sure you are using Leopard's default compilers (I have installed this ones which create a conflict with Gnuplot in that they do not enable -ObjC flag by default). The LDFLAGS link to the readline directory, already pointed by the --with-readline flag. When the configuration script has run, make sure that aquaterm, png, jpg, pdf and GNU readline are all compiled correctly. Then you can run make and make install.
Update. Gnuplot can be easily installed, with all dependencies, using MacPorts. I strongly recommend to do this.
Installing Fink
Fink does not come with a binary package for Leopard, therefore one must install it from source. Thankfully, this is extremely easy. Everything can be done by following the Important Note for Leopard Users found here. The only caveat is: when running ./bootstrap, you will be asked to make some choices (it's quite a long process). In most cases, you have just to press Enter and accept the default option. The only place where I have overridden a default option was about activating unstable repositories. I'd advice to do so, as many important packages are still available only in those repos. Important things:
- Do not forget set your path in your .profile file. An automatic way to do that is to run the command /sw/bin/pathsetup.sh in a terminal.
- Close the actual terminal and open a new one before running the final command fink selfupdate-rsync or fink selfupdate-cvs.
- If you are behind a firewall you have to setup fink to work correctly. In my case, whenever I need to use fink, I connect via VPN at UoB.
Monday 3 March 2008
VPN connection at UoB
If you have a UoB account and want to use Virtual Private Network authentication, these are the steps to follow
- under System Preferences>Network click "+" to create a new connection.
- Interface: VPN
- VPN Type: PPTP
- Service Name: whatever you like
- Configuration: Default
- Server Address: staff-vpn.bris.ac.uk (it could be student-vpn.bris.ac.uk in your case)
- Account Name: your UoB username
- Select Show VPN status in menu bar
- Under Advanced>Options, select Send all traffic over VPN connection (thanks Jon Ward for this essential tip!)
- activate your wireless connection (Air Port) if you haven't already
- Click on the
 icon and select Connection...
 - Insert password
- You are online
Important: if you are Tiger user, the Send all traffic over VPN connection step should be unnecessary. You'll be probably presented with a different interface to create the connection, but the settings should be analogous (thanks Thomas Melvin and Jon Ward).
Sunday 2 March 2008
MacFuse, SSHFS, MacFusion: mounting remote filesystems
These tools are great if you want to connect remotely to a server and mount locally a directory which lives on the server. In this way you can use all your local tools to edit/modify, copy/paste files: you'll be editing files on the server, but using local software. Install SSHFS and MacFuse and then MacFusion to manage your sshfs volumes from the desktop. Painless installation. One thing: if you want to see the mounted volumes appear on your desktop, do not forget to activate Show Connected Servers under Finder>Preferences>General.
Saturday 1 March 2008
Trilinos
Trilinos is a comprehensive set of libraries and solvers for parallel computation. The installation and configuration of Trilinos is not possible to cover here. On Trilinos website you will find adequate explanations as to how to install the packages. It makes sense, for other Trilinos users trying to install it under Mac OS X 10.5.2, to report here my configuration script
../configure \
--prefix=/usr/local/trilinos/trilinos-8.0.5/MAC_MPI/build \
--enable-mpi --with-mpi-compilers \
--cache-file=config.cache \
--enable-nox-lapack \
--enable-nox-epetra \
--enable-loca-lapack \
--enable-loca-epetra \
--enable-amesos \
--enable-anasazi \
--enable-aztecoo \
--enable-ifpack \
--enable-ml \
--enable-teuchos \
--enable-teuchos-complex \
--enable-triutils \
--enable-galeri \
--disable-examples \
--disable-tests \
CFLAGS="-O3 -ftree-vectorize" \
CXXFLAGS="-O3 -ftree-vectorize" \
FFLAGS="-O3 -ftree-vectorize" \
FLIBS="-Wl,-framework -Wl,vecLib -lSystem"
I have used these compilers and this MPI implementation. On goofy, you can link against Trilinos from the directory /usr/local/trilinos/trilinos-8.0.5/MAC_MPI/build.
OpenMPI
OpenMPI is an open source implementation of the Message Passage Interface protocol, which allows you to compile and run codes in parallel. OpenMPI is composed by a set of wrappers (mpic++, mpif77 etc.) to use in place of your favourite compilers and by scripts (mpirun, mpiexec, etc.) to launch the parallel job.
On goofy, I have used these GNU compilers and run
- ./configure CC=/usr/local/bin/gcc CFLAGS='-O3 -ftree-vectorize' CXX=/usr/local/bin/g++ CXXFLAGS=' -O3 -ftree-vectorize' F77=/usr/local/bin/gfortran FFLAGS=' -O3 -ftree-vectorize' FC=/usr/local/bin/gfortran FCFLAGS=' -O3 -ftree-vectorize'
- make all install
Friday 29 February 2008
Auto-vectorising C++ and Fortran compilers
This page is a good source of informations for High Performance Computing under Mac OS X. The link provides you with binary packages for the GNU C++, C and Fortran compilers for Leopard. The installation is very clean and goes entirely under /usr/local. These compilers allow auto-vectorisation.
On goofy I've installed XCode and Developer Tools, which install their own compilers. Therefore I have placed the GNU auto-vectorised compilers under /user/local, but I haven't included them in the path, as other users may want to use their own favourite compilers. If you want to use the GNU auto-vectorised ones, modify your .profile.
Important: these compilers do not activate objective C. Therefore, if you try to compile something with the -ObjC flag they would return you an error. When you need the -ObjC flag you can use the default Leopard's GCC compilers.
Ubuntu Linux under Parallels
Parallels is a non-free virtualisation software that allows you to run Windows or Linux under Mac OS X: I'm not talking about dual booting (i.e. a side by side installation, with you deciding which OS you want to load at boot time). What happens here is that you actually run the guest OS at almost native speed in a window of your Mac. Furthermore, you have facilities like copying/pasting from one OS to another, or synchronising folders and so on. Really good if you want to take the best of both worlds (Mac OS and Ubuntu Linux, in my case).
Installing Parallels is really easy from the installation cd.
Installing Ubuntu 7.10 as a guest OS is not hard. Follow this how-to from Parallels support forum.
Caveats:
- In my case, I had to select Bridged Ethernet to get an internet connection under Ubuntu (this is something you can change easily once the installation is done: stop the Ubuntu Linux virtualisation and then go to Edit>Virtual Machine and set Network Adapter to be Bridget Ethernet)
- Don't forget to upgrade to the latest Parallels version and to install the Parallels Tools
- Copy/Paste and Sinchronisation work well if the guest OS is Windows. It will be supported soon for Ubuntu Linux.
BibDesk: LaTeX bibliographic reference manager
BibDesk is a bibliographic reference manager for Mac OS X. BibDesk is designed to help organize and use bibliographic databases in BibTeX .bib format. In addition to manual typing, BibDesk lets you drag/drop or cut/paste .bib files into the bibliographic database and automatically opens files downloaded from PubMed. BibDesk also keeps track of electronic copies of literature on your computer and allows for searching your database through several keys. Easy installation from universal binaries
MacVim
If you are a vim user, MacVim is all you have ever desired. Mac OS X ships already with its own vim, to be called from the Terminal. MacVim is a port Mac OS X that is meant to look better and integrate more seamlessly with the Mac than the existing Carbon port of Vim. Use it and support it. It comes with a universal binary and a UNIX script. Please read this post to change the paths according to the new Leopard paradigm.
On goofy:
On goofy:
- unix command under /usr/local/macvim/bin
- path updated in the file /etc/paths.d/Macvim/etc/
Paraview
Paraview is a great free tool to visualise large data files. It works well for parallel applications and it has a very good server/client interface: the large data can be processed remotely on a server, and the client will only take care of the visualisation.
It is installed easily, being a universal binary. If you want the server/client facility, you will also install the unix commands provided. Please read this post to change the paths according to the new Leopard paradigm.
On goofy:
- unix commands under /usr/local/paraview/paraview-3.2.1-Darwin-i386
- path updated in the file /etc/paths.d/Paraview
Modifying PATH in Leopard
Apple has (regrettably, in my opinion) changed the way to modify the bash PATH variable system-wide. The old way was to carefully edit the file /etc/profile. The new way is quite different. Suppose you have the application MyNewApplication in /usr/local and want to include the directory /usr/local/MyNewApplication/bin in the PATH. Then what you do is
- Go to directory /etc/paths.d (yes, that's a directory) and create a file called MyNewApplication
- Edit the file MyNewApplication with the directory you want to include, i. e. /usr/local/MyNewApplication/bin. If you want to include more than one path of MyNewApplication, then add more lines (one line per path)
- Restart the Terminal
OpenTerminal
OpenTerminal allows you to quickly access a Terminal from Finder. The Terminal opens directly in the folder you're browsing with Finder. I find it very handy. There must be other software out there doing the same task (even better, maybe). Let me know if you recall any.
Subscribe to:
Posts (Atom)